CI/CD for NPM Package With CircleCI
Introduction
Recently, I am looking into solutions to setup a Continuous Integration and Delivery (CI/CD) pipeline for a library project I am working with, a React Component Library in specific - Codefee-Kit. Hence. it's a CI/CD for NPM Package that I am talking about here.
Over here, I am using CircleCI in particular for the CI/CD. It has a pretty accommodating free-tier plan for small scale project and experimentations. Plus, big players like Facebook, Spotify, etc. are using them. So, why not? 😛
Motivation
I figured that manually publishing the package was kind of a hassle in a long run. It can easily get out of control, and ended up with situations like I published version 0.0.30 to NPM registry but my source code's package.json at GitHub is still at 0.0.25 (Forgot to push codes and whatsoever 😛). It's a mess!
So, I figured that a proper CI/CD pipeline in place will in a way, force/help me to follow a specific one-way workflow in publishing a package and maintaining my source code version. That way, the ambiguity of package versioning between both can be solved.
Alright, let's get it started!
Topics Coverage
Please feel free to skip to the sections of your interest.
1. Prerequisite
You need to have an NPM account ready. If you don't have one, head over to https://www.npmjs.com/ and create one!
2. Overview
I was actually following the steps shared on the CircleCI Blog. It proves to be a very clear and concise article. In fact, I have gotten the things to work in just the matter of an hour. Thanks so much!
Essentially, we would wanna only deal with the source codes, bump the semver version with npm-version commands, e.g. "npm version patch/major/minor", etc. and commit the codes to our master/main branch.
When our master/main branch is ready, we just need to create a Tag for the release, and CircleCI will automatically fetch the updates, build, test and deploy/publish the package to NPM Registry.
So, no more manually publishing our npm package!
3. Create CircleCI Config File
First, we need to create a .circleci folder in our project's root directory.
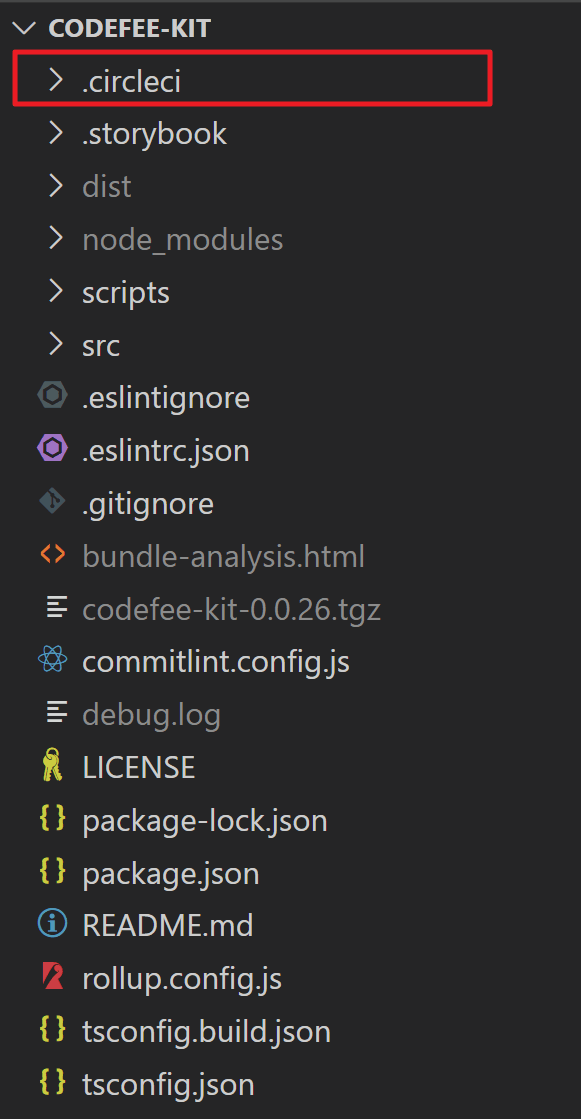
After that, include a config.yml inside the .circleci folder that you have just created. The config.yml content required is just the following. This was adapted from the CircleCI Blog. Of course, feel free to tweak it to suit your workflow!
1# Javascript Node CircleCI 2.0 configuration file
2#
3# Check {{ '/2.0/language-javascript/' | docs_url }} for more details
4#
5version: 2
6
7defaults: &defaults
8  working_directory: ~/repo
9  docker:
10    - image: cimg/node:14.16.0-browsers
11
12jobs:
13  test-build:
14    <<: *defaults
15    steps:
16      - checkout
17
18      - restore_cache:
19          keys:
20            - v1-dependencies-{{ checksum "package.json" }}
21            - v1-dependencies-
22
23      - run: npm install
24      - run:
25          name: Run tests
26          command: npm test
27      - run:
28          name: Run build
29          command: npm run build
30
31      - save_cache:
32          paths:
33            - node_modules
34          key: v1-dependencies-{{ checksum "package.json" }}
35
36      - persist_to_workspace:
37          root: ~/repo
38          paths: .
39  deploy:
40    <<: *defaults
41    steps:
42      - attach_workspace:
43          at: ~/repo
44      - run:
45          name: Authenticate with registry
46          command: echo "//registry.npmjs.org/:_authToken=$npm_TOKEN" > ~/repo/.npmrc
47      - run:
48          name: Publish package
49          command: npm publish
50
51workflows:
52  version: 2
53  test-build-deploy:
54    jobs:
55      - test-build:
56          filters:
57            tags:
58              only: /^v.*/
59      - deploy:
60          requires:
61            - test-build
62          filters:
63            tags:
64              only: /^v.*/
65            branches:
66              ignore: /.*/
67
That's it!. Commit and push it to your master/main branch.
4. Setting Up Project in CircleCI
Now, head over and create an account at https://circleci.com/. I have chose to sign up with my GitHub account since the project that I want to setup the CI/CD is in there.
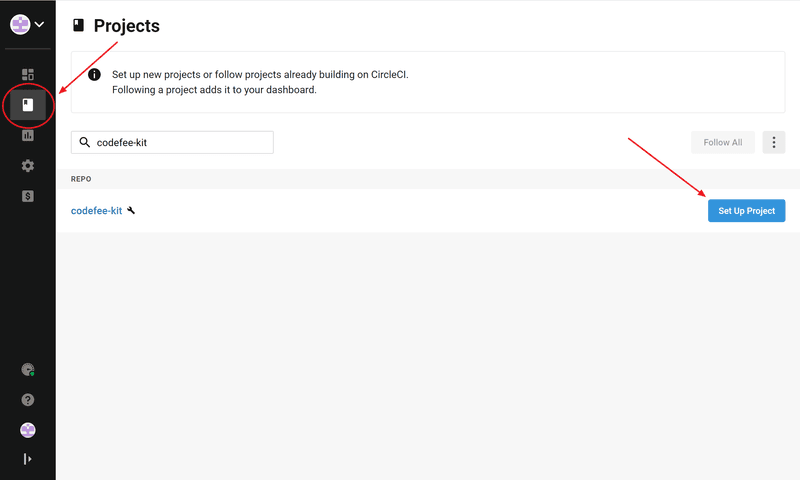
After signing in, navigate to "Projects" tab, choose the project that you want to setup, and click on its "Set Up Project" button.
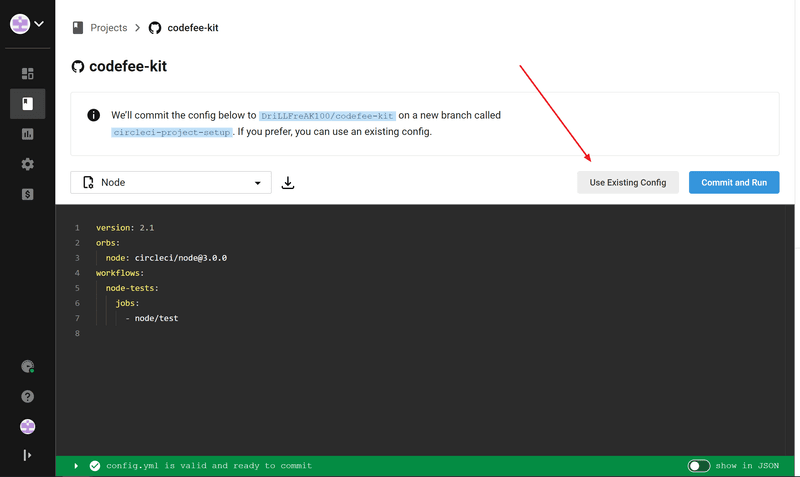
Since we have already committed and pushed our CircleCI config file in the previous section, just click on the "Use Existing Config" button.
After that, click on "Start Building" button.
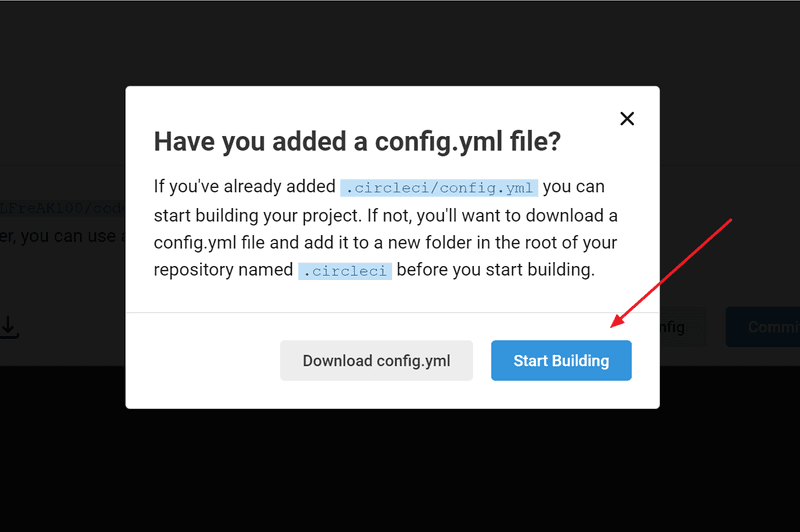
The build will not work properly at first due to our missing Environment Variable - $npm_TOKEN. This is a token that we need to provide to CircleCI.
Open up your bash, shell or command prompt, depends on the OS that you're using. Type "npm login" and follow through the authentication process.
Go ahead and dig up your .npmrc file. For Windows machine, it'll usually be at this location "C:\Users\%your user name%\.npmrc". You should be able to find your NPM authToken there, something like this.
1prefix=......
2//registry.npmjs.org/:_authToken=<strong>%Your Token HERE%</strong>
3
Copy that token and head over to CircleCI > Dashboard Tab > Project Settings.

At the Project Settings page, navigate to the "Environment Variables" tab, click on "Add Environment Variable" button.
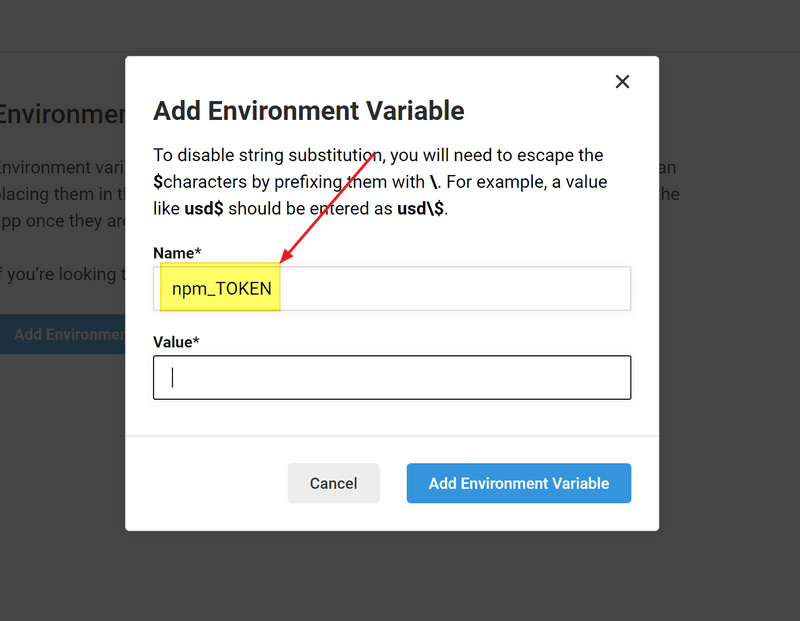
After that, fill up "npm_TOKEN" for the Name and paste the authToken value into the Value field. This value will be substituted by CircleCI during the deploy job.
Important to note, there is no need to put the dollor sign "$" as part of the name here. It will cause some JavaScript error and it wouldn't feedback to you haha... Just bear in mind for that.
For this repo, I mostly go by feature branches and merge my changes back to master/main. So, to reduce unnecessary CI or builds for me at this point of time, I switched on the setting for "Only build pull requests". This option is available at Project Settings > Advanced > Only build pull requests.
And there we go, we're done here! Whenever there is a Pull Request raised, CircleCI will now kick in, test and build our project for us automatically. Hence, the Continuous Integration (CI).
5. Publish to NPM
To publish to NPM Registry, there are 2 steps that we need to take.
Bump Package Version
First, bump/update the semver version our master/main branch with npm-version commands, e.g. "npm version patch/major/minor", etc. and commit + push the updates to our master/main branch.
Create a Tag
Next, we just need to create a Tag in our GitHub repository. CircleCI will fetch the changes automatically, start the build and publish the package to NPM Registry. Hence, the Continuous Delivery (CD).
This leads us into a workflow, where we have to "tag" or mark our repository's version as a Release, before it can get published to the npm registry. Which is what we wanted, a proper package release management and a predictable one-way process!
The tag MUST be named with something that starts with "v", ideally following the semantic versioning, something like this - v0.0.30. This is what we have configured in our config.yml file earlier on for the workflows section, i.e. the "only: /^v.*/" filter to only pick up Tags that are named starting with "v".
Ideally, we would wanna Tag the Release version to match the version in our package.json file after the bump.
1workflows:
2  version: 2
3  test-deploy:
4    jobs:
5      - test:
6          filters:
7            tags:
8              only: /^v.*/
9      - deploy:
10          requires:
11            - test
12          filters:
13            tags:
14              only: /^v.*/
15            branches:
16              ignore: /.*/
17
Conclusion
Setting up the CI/CD for npm package with CircleCI was a breeze. It has a pretty intuitive UI and I find it delightful to use the tool.
Though I'm not a master at yaml file, I find that the configurations are pretty easy to read and understand. And with the example provided in the CircleCI Blog, it was just a copy-paste chore to get started literally.
This is just a starting point for me too. Will definitely continue to look into ways to optimize the process and reduce any other unnecessary builds along the way as I find out more about CircleCI.
Alright, signing off here! Till the next one!
Codefee Time isn't complete without a coffee time! Hahahaha... Featuring Commandante Hand Grinder. What a workhouse to get that perfect daily grind!
